Create and attach a new disk
Originally published on 08 May 2020
In a series of upcoming posts, I'll be documenting how I've started to use BorgBackup to securely and remotely backup my laptop. In order to experiment and properly set things up, I had to provision Azure virtual machines with more than the 30 GB of storage they normally come with. To do this, I've started creating and attaching additional disks to the virtual machine. In this post, I'll document how you can do this in Ubuntu.
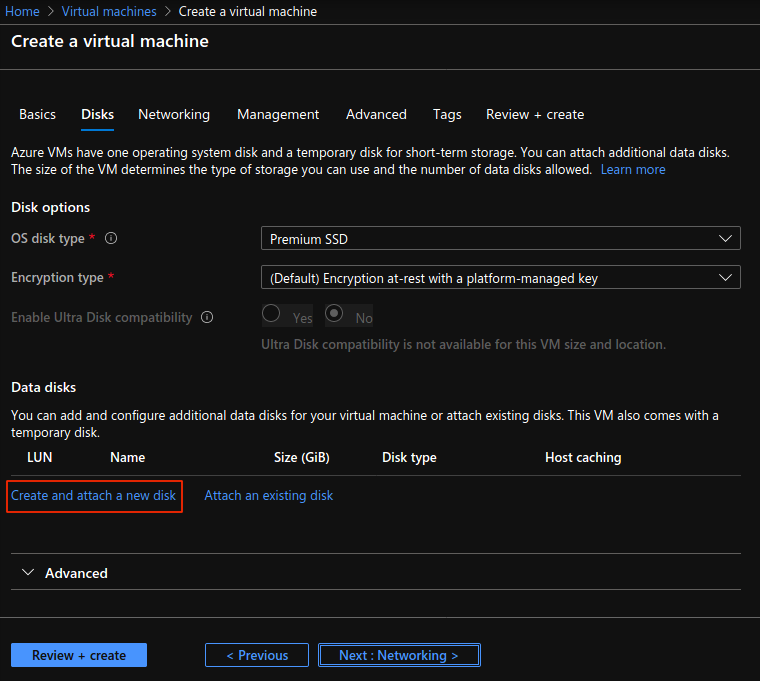
When you create a new virtual machine via the Azure dashboard, you need to make sure you select the "Disks" button at the bottom of the screen (which I normally skip over) which will take you to the following set of options:
Create and attach a new disk
Click the "Create and attach new disk" option near the bottom which will then take you this screen:
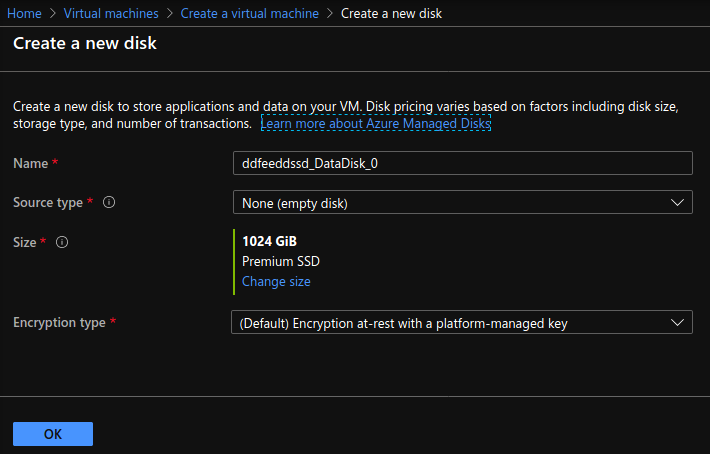
Create a new disk
Select the size of the disk that you'd like to attach and then click OK.
Once you log into your newly created virtual machine, you can just follow the excellent Microsoft documentation which walks you through the Linux commands to find, format and mount the disk. I'm going to repeat some of that here for reference.
First, find your disk using dmseg:
$ dmesg | grep SCSI
[    1.295720] SCSI subsystem initialized
[    2.223011] Block layer SCSI generic (bsg) driver version 0.4 loaded (major 244)
[    2.720037] sd 1:0:1:0: [sda] Attached SCSI disk
[    3.182526] sd 0:0:0:0: [sdb] Attached SCSI disk
[    9.674074] Loading iSCSI transport class v2.0-870.
[ 1027.173587] sd 3:0:0:0: [sdc] Attached SCSI disk
In this case, the disk we are looking for is labeled sdc. Now we can partition the disk using the fdisk utility:
$ sudo fdisk /dev/sdc
Type n at the command prompt to create a new partition and then accept the defaults.
Welcome to fdisk (util-linux 2.31.1).
Changes will remain in memory only, until you decide to write them.
Be careful before using the write command.

Device does not contain a recognized partition table.
Created a new DOS disklabel with disk identifier 0xcaa825b3.

Command (m for help): n
Partition type
   p   primary (0 primary, 0 extended, 4 free)
   e   extended (container for logical partitions)
Select (default p):

Using default response p.
Partition number (1-4, default 1):
First sector (2048-2147483647, default 2048):
Last sector, +sectors or +size{K,M,G,T,P} (2048-2147483647, default 2147483647):

Created a new partition 1 of type 'Linux' and of size 1024 GiB.
Once complete, type p to print or view the partition and then w to commit as shown below:
Command (m for help): p
Disk /dev/sdc: 1 TiB, 1099511627776 bytes, 2147483648 sectors
Units: sectors of 1 * 512 = 512 bytes
Sector size (logical/physical): 512 bytes / 4096 bytes
I/O size (minimum/optimal): 4096 bytes / 4096 bytes
Disklabel type: dos
Disk identifier: 0xcaa825b3

Device     Boot Start        End    Sectors  Size Id Type
/dev/sdc1        2048 2147483647 2147481600 1024G 83 Linux

Command (m for help): w
The partition table has been altered.
Calling ioctl() to re-read partition table.
Syncing disks.
Next, write the partition and format the disk using the ext4 filesystem using the mkfs command:
$ sudo mkfs -t ext4 /dev/sdc1
You should see something similar to the output below:
mke2fs 1.44.1 (24-Mar-2018)
Discarding device blocks: done
Creating filesystem with 268435200 4k blocks and 67108864 inodes
Filesystem UUID: 662b221b-a6da-4965-83a1-26b75981464a
Superblock backups stored on blocks:
        32768, 98304, 163840, 229376, 294912, 819200, 884736, 1605632, 2654208,
        4096000, 7962624, 11239424, 20480000, 23887872, 71663616, 78675968,
        102400000, 214990848

Allocating group tables: done
Writing inode tables: done
Creating journal (262144 blocks): done
Writing superblocks and filesystem accounting information: done
Now we can mount the disk. To do this, first create a directory to serve as the mountpoint:
$ mkdir ~/mountpoint
Then, mount the disk:
$ sudo mount /dev/sdc1 ~/mountpoint
The Microsoft documentation linked to above does a nice job of explaining how and why we need to add this disk and mountpoint to the system's fstab file so I'll quote it here:
To ensure that the drive is remounted automatically after a reboot, it must be added to the
/etc/fstabfile. It is also highly recommended that the UUID (Universally Unique IDentifier) is used in/etc/fstabto refer to the drive rather than just the device name (such as,/dev/sdc1). If the OS detects a disk error during boot, using the UUID avoids the incorrect disk being mounted to a given location. Remaining data disks would then be assigned those same device IDs. To find the UUID of the new drive, use theblkidutility:
$ sudo -i blkid
You should see something like this:
/dev/sda1: UUID="349ba30e-f1a2-4d0e-ad4f-7058a54d94c7" TYPE="ext4" PARTUUID="ad6ecb08-01"
/dev/sdb1: LABEL="cloudimg-rootfs" UUID="bdf328db-9606-49ba-8e44-5e1299ae56f0" TYPE="ext4" PARTUUID="179b1e79-bd71-4241-9557-8be63cbb8857"
/dev/sdb15: LABEL="UEFI" UUID="54D1-0F3A" TYPE="vfat" PARTUUID="ec4144dd-3a40-4774-bfc2-73488a3f8e39"
/dev/sdb14: PARTUUID="bddfd6d3-8ef9-40d2-8fda-0083f3e0df9b"
/dev/sdc1: UUID="662b221b-a6da-4965-83a1-26b75981464a" TYPE="ext4" PARTUUID="caa825b3-01"
Copy your partition's UUID and add the following line to your system's /etc/fstab file:
UUID=662b221b-a6da-4965-83a1-26b75981464a /home/username/mountpoint ext4 defaults,nofail 1 2You may also need to change the owner of the mountpoint from root to your regular user:
$ sudo chown -R username:username ~/mountpoint
To ensure that the fstab changes work properly, reboot your system and verify that the disk was mounted automatically once you log back into the system.
$ sudo reboot
$ df -h
You should see your disk automatically mounted:
Filesystem      Size  Used Avail Use% Mounted on
udev            3.9G     0  3.9G   0% /dev
tmpfs           794M  668K  793M   1% /run
/dev/sdb1        29G  1.5G   28G   5% /
tmpfs           3.9G     0  3.9G   0% /dev/shm
tmpfs           5.0M     0  5.0M   0% /run/lock
tmpfs           3.9G     0  3.9G   0% /sys/fs/cgroup
/dev/sdb15      105M  3.6M  101M   4% /boot/efi
/dev/sda1      1007G   77M  956G   1% /home/disktest/mountpoint
/dev/sdc1        16G   45M   15G   1% /mnt
tmpfs           794M     0  794M   0% /run/user/1000
Note that as the documentation alluded to, the name of the disk actually changed from sdc to sda which is why we referenced the UUID in the fstab file. You can now use this additional space to store your backups.